Every strike brings me closer to the next home run.
~Babe Ruth
The best way for me to come across tips for ScreenFlow is to delve into the program for a project. Invariably, something comes up that I don’t know the answer to, and thus a tip is born! This time, it has to do with boosting audio levels.
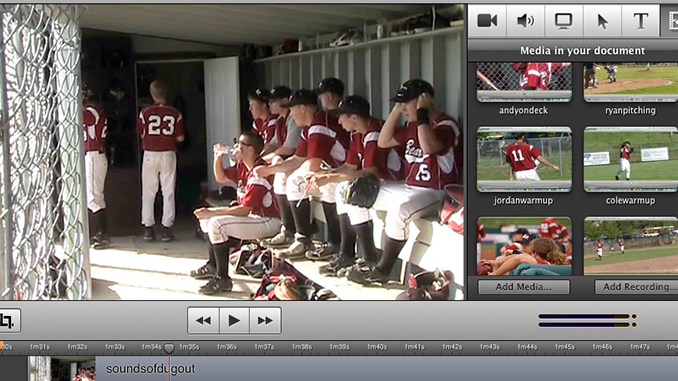
I recently used ScreenFlow to create and edit a 5-minute video for my son’s high school baseball team, which included video, pictures, music and some typical sayings that would remind them of their 2010 season.
During the video, I transition from background music to a segment filmed in the dugout, with the boys’ voices providing commentary. One of the challenges I had was that when I brought that section of the video into ScreenFlow, the level of sound that my little Canon camcorder provided was very low. I was able to boost the level up to 170% using the audio levels in ScreenFlow, but it still wasn’t quite as loud as I wanted it to be.
I promptly went to the ScreenFlow forum, and found a “trick” suggested by PCG (aka Prescott Computer Guy). He says, “My “trick” here is to copy and paste the audio track [again]… when “stacked” they have more volume.”
Voila! It worked. I detached my audio from my video, then I copied the audio track and pasted it just below the original audio track on the timeline. I lined them up perfectly, and when combined, the audio levels were much more acceptable.
 Of course, if your audio is bad, then by amplifying it, you’re only going to make it worse. So use this tip judiciously.
For my purposes though – a fun, non-professional video- it worked perfectly!
If anyone’s interested, I uploaded a version of the video that you can see here. I’m still working on some quality issues with the video – namely the dropped frames in the video clips, which I suspect have to do with the way I encoded the original .mod files before bringing them into ScreenFlow… perhaps that will provide fodder for the next ScreenGenius tip!
Lynne,
Great tip to stack the audio. I didn’t think of that.
I like how you’re using ScreenFlow more as non-linear video editor. In a lot of ways it’s more intuitive than iMovie and doesn’t nearly have the complexity of FCE.
How’d you get to use copyrighted music in your video? I thought YouTube would take down videos with commercial music in them. Is there a legal way to include it?
Thanks, Scott
Hi Scott,
Yes, I find ScreenFlow to be a very easy non-linear editing tool. It may lack some features that professional editors require, but for my purposes, it’s easy, intuitive and effective.
As for the copyrighted music: I got a notice when I uploaded the content that said:
“Your video may include content that is owned or licensed by these content owners:
Content owner: Sony Music Entertainment Type: Audio content
Content owner: WMG Type: Audio content
What should I do?
No action is required on your part. Your video is still available worldwide. In some cases ads may appear next to your video.”
It may depend on the content owner as to whether they allow you to use their music. (My video usually has a few “buy this song” ads that pop up during viewing). I do need to look into that though.
There is a somewhat more ‘normal’ solution, which takes longer to describe than to do! My problem is that I use music, and even with ducking activated, the talking is too quiet by comparison: so when the video and audio are basically ready, I save the project, cut the music track, export the audio track without saving again, normalize it in an audio editor and import it back again.
Export: in the ‘customize’ dialogue box, delect ‘video’, change AAC to AIFF to avoid compression things too early
Normalize: in an app like Soundtrack Pro or SoundBooth if you have them, or in a shareware like SoundStudio or a freeware like Audacity: if you have widely different parts, you can select then separately and normalize them deparately.
Putting it back: you can delete your original speaking track and drag the normalized version from the desktop, move the cursor to the beginning and paste back your music track, which – if you haven’t done anything else in the mean time – will still be on the clipboard. And of course, you can reduce the master volume of the music if you like …
Lynn,
In addition to the techniques already discussed, I also use the free tool called The Levelator (http://www.conversationsnetwork.org/levelator, for all three major OS’s,) to do look-ahead compression. It works especially well for panel discussions where the speakers’ voices are at different levels. Some people have good “projection” (use that diaphragm!) and others don’t. This levels them out by dropping the high gain sections and bringing up the softer ones.
Only one caveat: if there is a quiet portion, it tends to drop out the audio completely, even the ambient noise, so it can be a little strange at points. I’m hoping they address that in future releases. But since it’s free, I’m not complaining!
Thanks Craig,
So how does it work: Do you export the audio from ScreenFlow first, then pull it into The Levelator?
Yes, you’d do an audio-only export from ScreenFlow using Willow’s great tutorial (http://bit.ly/bcoQi2). But instead of selecting MP3 in the iTunes encoding menu, select AIFF format. The Levelator can only work with WAV and AIFF files.
Once you have it converted, drag it back into ScreenFlow and synchronize it with your current audio file. Leave your old one there and mute it, et Voila! You have a highly compressed audio file right in ScreenFlow.
Great! thanks for the tip Craig
cool tip, thanks, worked perfectly for me. Very nice workaround… Would be nicer if screenflow would allow audio boost by 250%…